Thursday, 20 April 2017

Thoughts on Being Creative

I really, really meant to write a post last month. I really did. But before I knew it the month was over. Guess that's what happens when you write your last post right at the start of the month ^^;

I do, however, have an Instagram account now. You'll find it here at blackhorsebeth. I post photos of my models there, and I generally upload a bit more frequently, since I don't have to write out a long article for each photo. Give it a follow if you'd like :)

Before I start this post I just wanted to thank Horse Tender Studio for her wonderful support and encouragement following my last post (hugs back).
Anyway, this time I wanted to talk to you about creativity. Specifically, how to go about being creative.

My depression is a huge drain on my creative energy. I can't even begin to count how many times I've wanted, desperately, to do something creative, only for my depression to get in the way and stop me, sometimes after I've already started. It's incredibly frustrating. 

That said, I know that many other people without depression also experience frustration when they try to be creative, so this post is for everyone, regardless of circumstances or illness.

 So, let's get started.

First piece of advice: always keep a notepad handy! 

I'm terrible at remembering a long list of things I have to do, so if an idea or inspiration pops into my head, I find it vital to jot it down immediately. Otherwise, I'll have forgotten it in a couple of hours, and its so frustrating to sit there desperately trying to remember what it was you thought of, only for your brain to come up blank.
Secondly: a good environment is essential.

Your mind should be on your creative project, not on what's going on around you. Look for somewhere comfortable, well-lit, with few distractions. A good chair or stool will help to reduce stiffness and backache, and proper lighting will cut down on eye strain. Try to find a location where you feel creative, where your mind is conditioned to work. I find that if I try to write whilst sitting on my bed, I get tired and sleepy very fast. But my desk is where I do my art, so my mind is much more receptive to work in that location. It's part of the reason many artists have a studio.
Third: good equipment is invaluable.

Good doesn't necessarily have to mean expensive. Often very common supplies can be good quality. But trying to work with rubbish supplies is just infuriating, and time wasting. You want to make the best use of your creative energies, not waste them trying to make awful equipment do what you want. Invest in good quality equipment and materials, and spend your energy where it counts.
So, that's the practical stuff, but what about the emotive side to being creative?

Since the depression makes my brain very receptive to negativity in the first place, I can often find it discouraging and demotivating to see the amazing work of other artists, especially those younger than me. So, to try to combat those feelings, I've compiled a list of motivational and encouraging quotes from other creative people that have helped me. (Why is it in purple? Because purple is inspiring :) )

"You're never going to be as good as you want to be, so learn to be happy with how good you are"

"You're never too good to get better"

"Your tastes will always outstrip your talent - don't be discouraged if what you see in your head doesn't translate exactly into your work"

"Try to avoid slipping into a 'gold rush' mentality - where you're never satisfied with what you're doing or what you've got right now"

"Take the time to celebrate every victory, no matter how small"

"Don't look at other people's' work and feel disheartened - remember, everyone has their own different strengths and weaknesses"

"Everyone - even the very best - had to start somewhere"

"Learn to see critique as help to improve, rather than criticism"

"If you have to force the art, it's time to take a break"

"'First Time Customisers' doesn't necessarily mean 'First Time Artists'"

The following quotes come from a creative individual on Youtube - Craig Benzine, a.k.a. WeezyWaiter. Here's a link to the video. 

"Think of all your work as an experiment, not your masterpiece"

"Quantity and quality aren't mutually exclusive, but the more you make the better your work will become."

"Set yourself limits and schedules"

"Don't necessarily wait for inspiration - creativity will take effort. Inspiration will come to you when you're ready for it, when you're already creating and your mind is open to new ideas"

"Nothing is original - Everything is based on something else, something that's already been done before. Nothing you make will be totally brand new, so don't let the thought that "It's already been done before" stop you"
Ok, I think that's enough for now. I hope this helps some of you, and I'm hoping it'll help me as well. 

See you next month (if I can remember, this time ^^; )

Thursday, 2 February 2017

Update, and Crafting Doll Boots

First things first, I must apologise, again, that it has been so long since I last posted. 

The simple truth of the matter is that my depression makes it very difficult to do most things that I normally enjoy doing, including blogging.

I've had chronic depression for the last 12+ years, and its severity can vary wildly from barely noticeable to unable to leave the house. I've tried to post about it here so many times I've lost count now, but every time I deleted the post because I reasoned that people don't come here to read about my mental health. However, I'm mentioning it here now because I want to be honest with you guys about why I don't post so often these days. Other bloggers who occasionally write about their struggles with depression, like Horse Tender Studio, have helped me to see that it's ok to write about it, so I'd like to ask you to please be patient with me: I haven't forgotten about or abandoned my blog, I'm just struggling to post as often as before. With that said, I've set myself the goal to post at least once a month, so we'll see how that goes.

But enough about that, moving on.

Plenty has happened, model wise, since I last posted. New faces have joined my herds, I've rediscovered my love of Grand Champions Model Horses (I hope to write a more in-depth post on them at some time in the future), and I'm slowly making my way through the 101 craft projects I'd like to attempt. And, on that news, I'd like to introduce you to some non-equine faces.
 Another blog that I enjoy reading is Tiny Horse Talk, and for some time now she has been posting about making clothes and props for her Breyer doll, Sarah. The more I read the more I felt inspired to get a poseable doll and make some of my own accessories for it. 
 In the end, I got three. The two blond dolls are both Grand Champions riders that I was able to buy very cheaply second hand. The brunette is a Breyer Classics doll, and also came to me second hand with a foal that I've been after for a while now.
 They're both from the Pet Groomer set. I wasn't too bothered about getting the other animals and items from the set, so when these two were offered for a very good price, I went for them.
 The foal goes perfectly with the Classic Haflinger mare. He's meant to be a palomino, but since their colours are so close, foals often have lighter baby coats anyway, and pangare on flaxen chestnut lightens the coat to the point that many people confuse it for palomino, I have no trouble calling him a Haflinger. 
 Since Mum's name is Dancing Gypsy, baby told me he wanted to be called Traveller's Tango, or Tango for short.
Anyway, back to our dolls. I decided very early on that I preferred the brunette's clothes on one of the blondes, so shirts and shoes got swapped around. Unfortunately, being second hand, one doll came without shoes, so once swapped over that left the Breyer doll with literal cold feet.
 As an interesting side note, the Grand Champions dolls (left) have longer feet than the Breyer Classic doll's (right). Thankfully the Breyer shoes still fit the GC doll.
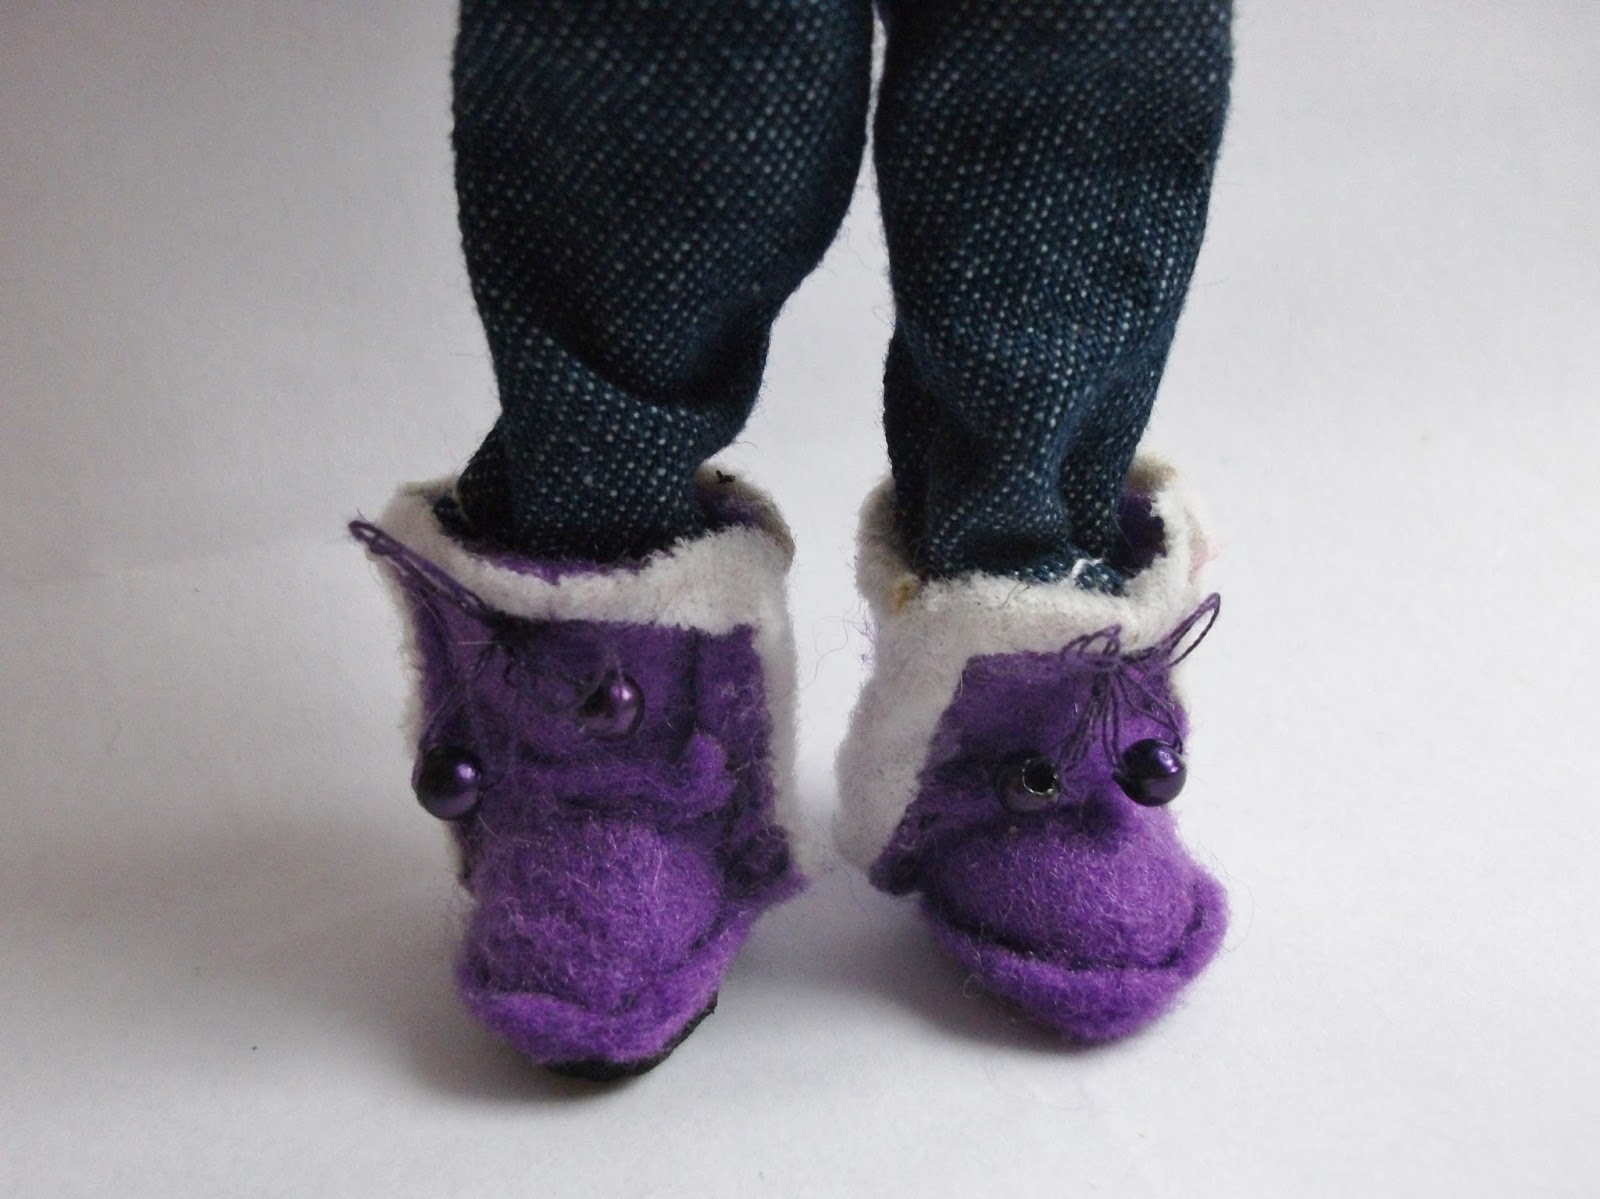
After doing a bit of searching on ebay for spare shoes, I failed to find anything suitable, so I opted instead to try making my own boots for the doll. Most of the tutorials I found seemed too complicated or required materials I haven't got, but then I stumbled across this step-by-step guide by My Froggy Stuff for making doll UGG boots. I had felt, I had needles and thread, so I decided to give it a go!
Of course, as a first attempt they're a bit crude. I opted for purple felt to match the doll's waistcoat, and I used some old thin white fleecy material for the trim. It didn't work out as well as I was hoping, but it does pull the whole thing together, so I'm not sorry. 
I had a bit of trouble at first following the tutorial, but thankfully I could pause and rewind the video as often as necessary until it finally clicked into place for me. I really find video tutorials helpful in this regard, because watching someone actually going through the steps is more useful than looking at a signal frame in a photo guide. 
 The soles were actually cut from a piece of black foam that previously came as packaging for some sort of electrical equipment (I can't remember exactly what, it's been so long...). The foam was perfect for the job, and I just love it when you get a chance to use one of those hundreds of 'come-in-handies' we all have lying around :) I tweaked the tutorial slightly by scoring the underside of the soles with some scissors to add ridges for extra grip.
 Of course, 1:12 (Classic) scale is much smaller than the 1:6 scale of most Barbie-type dolls, which the tutorial was made for, so sewing and gluing everything was very fiddly. And I had no buttons small enough to use as final details, so instead I dug through my craft box until I came across 4 purple beads. Using a needle and thread, I sewed bows onto the front of the boots, added the beads onto the loose ends and secured them with a knot on the inside. It would probably have been easier to use wool or embroidery floss for the laces, but cotton thread was all I had :)
  Once the glue had completely dried I pulled the boots onto the Breyer doll's feet, and I'm very happy with the end result. Thankfully, UGG-type boots are designed to be large and easy to pull on. The felt isn't the exact same colour as her vest, but that doesn't bother me. 
 Her jeans didn't really want to tuck inside the boots, but with some gentle persuasion they can be encouraged to go in. The large soles of the boots help the doll to stand up, and her feet fit snugly inside.
All that was left was to give her a name. With her brown hair and blues eyes, she reminds me of my late aunt, so I decided to name the doll 'Janet' after her. I think it suits her, but I don't have any blonde women in my family, so I'm still trying to figure out what to name the GC dolls. I'd like to make more items of clothing for all three of them eventually. But I might need a while to recover from the tininess of those boots :)

Wednesday, 21 September 2016

Headcollar 1.2

Remember my rather failed first attempt to construct a model horse headcollar?
Well, now it looks like this:
That's right, I finally went out and purchased some glue (like a sensible person :D), and decided to have a go at rebuilding my earlier catastrophic attempt. 
 The hardest part was unpicking all those terrible stitches, but once that was done I was able to reuse all the the parts from the original headcollar. 
This time, I was careful to make sure that all the ends were tucked under the inside of the headcollar, so the end result is much neater. I also managed to get the buckle on the right side this time (yay!). 
Unfortunately, I still didn't have anymore pink ribbon in the exact same matching shade, but this time I decided to use the black part as the throat strap so it's less visible from the top and front. I think it looks much better this way, and actually looks kind of smart, to me at least.
 Jewel thinks this headcollar looks much better on her than on its previous owner, and I'm inclined to agree. I guess I'll just have to make a new one for my long-suffering Morgan ^^;
 I folded the excess ribbon over the rings just like before, but this time I glued them on the underside instead of sewing them.
 To hold the ribbon in place while it dried, I used bobby pins/hair grips! :)
Thankfully, the glue was quick drying, so I didn't have to wait too long.
 
 I decided to leave the pink thread on the leadrope as I liked the contrast and the way it ties together the two parts.
  The free end of the strap that goes through the buckle was lined with glue to prevent the edge from fraying.
 The glue I used was Anita's PVA Tacky Glue. I'd heard other hobbyists talk about using "Tacky Glue" in the past, so when I saw this I figured it was worth a try. 
 I hadn't realised that what they'd been describing all along had been PVA, the stuff I'd used extensively in primary school arts and crafts, and the stuff used on children's DIY shows to make papier mache crafts.
 At least I've got plenty of experience with using PVA glue, so that helped me to feel more confident using it for my project. I also feel much more comfortable using it around my model horses, as it's less likely to damage them than other bonding agents like super glue.
 I was also encouraged by the fact that this glue is described as appropriate for, among other things, "non-washable fabric projects", which sounds like model horse tack making to me :)
 Whilst I appreciate that other glues would probably be more durable and hold better, my tack is intended for display rather than play, so it shouldn't have to put up with much rough handling. And at least if this does pull apart it's easy enough to reapply the glue and stick it back together. And the quick drying time is a big bonus. 
I love the precision nib on the cap that helps to prevent more glue coming out than needed. It really made sticking the ends of the ribbon together much easier.
In addition to my now headcollar-less Morgan mare, I've got a few other models that are also waiting for halters. Since I now have the glue to stick them together, and I've invested in some real jump rings, I'm looking forward to making more of my own headcollars. I'll try to make sure I've got enough ribbon for future projects, though :)

Wednesday, 31 August 2016

Long Overdue

I'm so sorry it's taken me so long to update this blog. Moving into our new house has been delay after delay, but we're finally in and settled now. Hopefully I can get back to more regular posts from now on.

In addition, sorry for the lack of pictures: my tablet won't let me add any photos to the post...

In positive news, I'm delighted to finally have my Breyers back again after about 5 months in storage during what can only be described as a nightmare house move. But it's all done now, and my boys and girls can canter around on their new shelves now.

Because they were going into storage, and because I've read horror stories about oozies and shrinkies, I stupidly thought it would be better to wrap them in paper than bubble wrap. Only later, after it was all done, I came across a post on another thread about someone getting a model in the mail that had been wrapped in just paper, leaving it with terrible scratches all over! So I was terrified of what I'd find when I unpacked my models.

Thankfully, and to my massive relief, my babies don't seem to have been hurt by the paper wrapping. Maybe it's because they were packed tightly in their boxes so they couldn't move around and scratch against the sides? Maybe it's because I used softer, white parcel paper to wrap them in, rather than the harsh brown paper? Either way, they seem to be remarkably unscathed. None of them are perfect
anyway, so if they have the odd minor rub I probably wouldn't notice it anyway, but I think next time I'll stick to softer packing materials...

Monday, 13 June 2016

Heartbeat's First Adventure

Hello, lovely reader people!

Since Beth is currently busy with packing and stuff, she asked me to write the blog post this time. And let me tell you, typing is hard work when you're only a fraction of the size of the keyboard!

For my first blog post I thought I'd share with you my first adventure into the big wide world.
Ok, ok, so it was the garden. But it's big and wide to me!
 All that grass did look tempting, though...
 
But it was much bigger up close! I could barely walk through it: it was like trying to explore a jungle!
Once I got out of the grass I decided to stick to the stone pathways. At least its easier to walk on them, but it sure was dark over there...
 That's a long path for a small horse!
Ah! The wind blew me over!
 Maybe I'll be more secure in the flower beds...
That is one big strawberry plant. Mmmm, strawberries....
 I followed the plants for a little while, and somehow made it onto this trellis...
 
Ooh, er, I appear to be stuck...Um, little help?
Phew, that's better!
 At least from up high I was able to spot a patch of fine, sandy soil that I asked Beth to put me down on.
 A good dust bath was just what I needed to get over getting stuck up high!
 Hey, I found a log!
Beth told me horses are meant to jump over logs, not climb on them, but I thought climbing was much more interesting.
 After that there was just time for a photo shoot...
...and then it was time for bed. After all that adventuring I was glad to get back into my nice safe pony pouch.

See you next time!