Tuesday 2 May 2017

Copperfox Second

If you haven't heard of them yet, Copperfox Model Horses is a relatively new British company that produces high quality model horses that represent British breeds. Founded by Becky Benfield, the owner of Utterly Horses, and initially funded by a Kickstarter campaign, they have now been going for a few years, and so far have 4 moulds produced: an Exmoor Pony, a Welsh Cob, a Connemara and an Irish Sport Horse.
I've admired Copperfox models from the start, but never bought one before. For a start, they're about twice the price of a Breyer Traditional regular run. This is due, in part, to the high level of detail put into painting each model. They're also limited to about 250 pieces for each colour, so they're produced in much smaller numbers than Breyers. All of this combined, I didn't want to spend so much money on a model that, because I don't live show, would have it's potential wasted by just being sat on my shelf.
But then, Copperfox released their line of 'Seconds' - models with small flaws in their paintwork or finish that leave them in less than perfect condition, but still great as shelf models or custom projects. Some Seconds can even excel at photo showing, depending on the nature of their individual flaws. And, to top it all off, they're about half the price of a standard Copperfox!
I decided to go for it. I actually generally prefer models with a few small flaws: it makes me less paranoid about handling them. And I wouldn't be wasting the showing potential of a pristine model: if a regular Copperfox is like a show horse, a Second is like a general pony kept for pleasure riding :) That suits me down to the ground, and there was one particular Copperfox that caught my eye from the moment she was released...
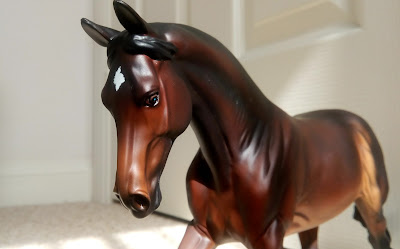
Cadno, the seal brown Connemara! Next to chestnuts, I've got a real soft spot for seal brown horses and ponies. I love the soft highlights on the otherwise dark coat, and unlike most other model horse collectors, I'm not drawn to flashy pintos or loud appaloosas. I'd rather have a dark, quiet little wallflower of a pony than a showy, attention grabbing sport horse. If she was a real pony, I think Cadno is the kind of animal I would be drawn to in real life.
 But don't get me wrong: she's anything but boring. Her coat is full of wonderful shading and highlights, her eyes and hooves are gloriously detailed, and her subtle little star and sock add a splash of interest to her features.
 Her eyes, nostrils and hooves have been glossed. I love how detailed her sculpting is: there's just so much life in the model.


 Just look at how detailed her hooves are!
 
 
 Being a Second, she does have flaws. They range from very minor, like slight rubs on the tips of her tail, to moderate, like pin point rubs on her belly and flank, and white flecks on her neck, to the most noticeable which is a shiny streak on her barrel.
Although I didn't know exactly what flaws she'd have when I bought her, I did know that she wouldn't be in perfect condition. And that's totally fine: like I said, I prefer slightly flawed models. If anything, the little marks and imperfections are more realistic of a real life pony. And, as you can tell, the marks themselves don't really photograph very clearly anyway, so I don't think they'd be much of an issue if I wanted to photo show her :) 
 
  Since she's a second, Cadno came with writing on her belly saying "CF Second 2017". She also didn't come with a subscription to the Copperfox magazine, Utterly Horses, or a Certificate of Authenticity.
 On her inside thigh is the Copperfox brand mark, with lettering over the top of the Fox logo.
 Just like a Breyer, Copperfox models are made of two halves glued together, and need an air hole to reduce the risk of bloating due to temperature fluctuations. I like the fact that the air hole is  placed in a much more inconspicuous location between the Copperfox's back legs, than the very noticeable air hole on a Breyer's lip or nostril.
 Something I'd read about from other Copperfox owners is that the models have a small blue spot in the centre of their eyes, to add further realism. I wasn't really sure whether I liked this idea, but seeing it in real life for myself, it's actually very subtle. You only really notice it if you're focusing on it, and even then it's not that distracting or out of place.
  The bottoms of her hooves are unpainted, so you can see the base colour. Only her raised hoof has any sculpting detail on the underside: all of the others are flat.
In the shade Cadno can look a little flat and dull, but place her in bright sunlight and her colours reall pop!
  She's practically glowing!
 
 
I've got 4 or 5 models waiting in line to have halters made for them, but I just had to jump the queue and craft a special halter for Cadno.
  I had some silver ribbon that I've been saving for a special horse, and I really liked how it contrasted with her dark coat. 
They're hard to see because they're a bit too small, but the jump rings are silver, and I made the buckle out of a bit of silver jewellery wire bent into shape.
I'm still very much an ameteur tack maker, so it's not perfect. But I'm still very happy with the final outcome, and I think it looks really good on her.
 The leadrope was a piece of twisted cord that was used to attach the cardboard label to a brand new shirt. All I did was tie it onto a ring and lobster clasp. I might see if I can find a silver clasp to replace the gold one, but for now I think it looks fine.
Oh, and I already decided on a name for her before she arrived. Since she's got a dark brown/black coat, I've opted to call her Sable. I think it's a nice, subtle name for a quiet, humble pony. And because of the reasons I stated at the start of this post, her show name is Making Dreams Possible (cheesy, I know XD)

Thursday 20 April 2017

Thoughts on Being Creative

I really, really meant to write a post last month. I really did. But before I knew it the month was over. Guess that's what happens when you write your last post right at the start of the month ^^;

I do, however, have an Instagram account now. You'll find it here at blackhorsebeth. I post photos of my models there, and I generally upload a bit more frequently, since I don't have to write out a long article for each photo. Give it a follow if you'd like :)

Before I start this post I just wanted to thank Horse Tender Studio for her wonderful support and encouragement following my last post (hugs back).
Anyway, this time I wanted to talk to you about creativity. Specifically, how to go about being creative.

My depression is a huge drain on my creative energy. I can't even begin to count how many times I've wanted, desperately, to do something creative, only for my depression to get in the way and stop me, sometimes after I've already started. It's incredibly frustrating. 

That said, I know that many other people without depression also experience frustration when they try to be creative, so this post is for everyone, regardless of circumstances or illness.

 So, let's get started.

First piece of advice: always keep a notepad handy! 

I'm terrible at remembering a long list of things I have to do, so if an idea or inspiration pops into my head, I find it vital to jot it down immediately. Otherwise, I'll have forgotten it in a couple of hours, and its so frustrating to sit there desperately trying to remember what it was you thought of, only for your brain to come up blank.
Secondly: a good environment is essential.

Your mind should be on your creative project, not on what's going on around you. Look for somewhere comfortable, well-lit, with few distractions. A good chair or stool will help to reduce stiffness and backache, and proper lighting will cut down on eye strain. Try to find a location where you feel creative, where your mind is conditioned to work. I find that if I try to write whilst sitting on my bed, I get tired and sleepy very fast. But my desk is where I do my art, so my mind is much more receptive to work in that location. It's part of the reason many artists have a studio.
Third: good equipment is invaluable.

Good doesn't necessarily have to mean expensive. Often very common supplies can be good quality. But trying to work with rubbish supplies is just infuriating, and time wasting. You want to make the best use of your creative energies, not waste them trying to make awful equipment do what you want. Invest in good quality equipment and materials, and spend your energy where it counts.
So, that's the practical stuff, but what about the emotive side to being creative?

Since the depression makes my brain very receptive to negativity in the first place, I can often find it discouraging and demotivating to see the amazing work of other artists, especially those younger than me. So, to try to combat those feelings, I've compiled a list of motivational and encouraging quotes from other creative people that have helped me. (Why is it in purple? Because purple is inspiring :) )

"You're never going to be as good as you want to be, so learn to be happy with how good you are"

"You're never too good to get better"

"Your tastes will always outstrip your talent - don't be discouraged if what you see in your head doesn't translate exactly into your work"

"Try to avoid slipping into a 'gold rush' mentality - where you're never satisfied with what you're doing or what you've got right now"

"Take the time to celebrate every victory, no matter how small"

"Don't look at other people's' work and feel disheartened - remember, everyone has their own different strengths and weaknesses"

"Everyone - even the very best - had to start somewhere"

"Learn to see critique as help to improve, rather than criticism"

"If you have to force the art, it's time to take a break"

"'First Time Customisers' doesn't necessarily mean 'First Time Artists'"

The following quotes come from a creative individual on Youtube - Craig Benzine, a.k.a. WeezyWaiter. Here's a link to the video

"Think of all your work as an experiment, not your masterpiece"

"Quantity and quality aren't mutually exclusive, but the more you make the better your work will become."

"Set yourself limits and schedules"

"Don't necessarily wait for inspiration - creativity will take effort. Inspiration will come to you when you're ready for it, when you're already creating and your mind is open to new ideas"

"Nothing is original - Everything is based on something else, something that's already been done before. Nothing you make will be totally brand new, so don't let the thought that "It's already been done before" stop you"
Ok, I think that's enough for now. I hope this helps some of you, and I'm hoping it'll help me as well. 

See you next month (if I can remember, this time ^^; )

Thursday 2 February 2017

Update, and Crafting Doll Boots

First things first, I must apologise, again, that it has been so long since I last posted. 

The simple truth of the matter is that my depression makes it very difficult to do most things that I normally enjoy doing, including blogging.

I've had chronic depression for the last 12+ years, and its severity can vary wildly from barely noticeable to unable to leave the house. I've tried to post about it here so many times I've lost count now, but every time I deleted the post because I reasoned that people don't come here to read about my mental health. However, I'm mentioning it here now because I want to be honest with you guys about why I don't post so often these days. Other bloggers who occasionally write about their struggles with depression, like Horse Tender Studio, have helped me to see that it's ok to write about it, so I'd like to ask you to please be patient with me: I haven't forgotten about or abandoned my blog, I'm just struggling to post as often as before. With that said, I've set myself the goal to post at least once a month, so we'll see how that goes.

But enough about that, moving on.

Plenty has happened, model wise, since I last posted. New faces have joined my herds, I've rediscovered my love of Grand Champions Model Horses (I hope to write a more in-depth post on them at some time in the future), and I'm slowly making my way through the 101 craft projects I'd like to attempt. And, on that news, I'd like to introduce you to some non-equine faces.
 Another blog that I enjoy reading is Tiny Horse Talk, and for some time now she has been posting about making clothes and props for her Breyer doll, Sarah. The more I read the more I felt inspired to get a poseable doll and make some of my own accessories for it. 
 In the end, I got three. The two blond dolls are both Grand Champions riders that I was able to buy very cheaply second hand. The brunette is a Breyer Classics doll, and also came to me second hand with a foal that I've been after for a while now.
 They're both from the Pet Groomer set. I wasn't too bothered about getting the other animals and items from the set, so when these two were offered for a very good price, I went for them.
 The foal goes perfectly with the Classic Haflinger mare. He's meant to be a palomino, but since their colours are so close, foals often have lighter baby coats anyway, and pangare on flaxen chestnut lightens the coat to the point that many people confuse it for palomino, I have no trouble calling him a Haflinger. 
 Since Mum's name is Dancing Gypsy, baby told me he wanted to be called Traveller's Tango, or Tango for short.
Anyway, back to our dolls. I decided very early on that I preferred the brunette's clothes on one of the blondes, so shirts and shoes got swapped around. Unfortunately, being second hand, one doll came without shoes, so once swapped over that left the Breyer doll with literal cold feet.
 As an interesting side note, the Grand Champions dolls (left) have longer feet than the Breyer Classic doll's (right). Thankfully the Breyer shoes still fit the GC doll.
After doing a bit of searching on ebay for spare shoes, I failed to find anything suitable, so I opted instead to try making my own boots for the doll. Most of the tutorials I found seemed too complicated or required materials I haven't got, but then I stumbled across this step-by-step guide by My Froggy Stuff for making doll UGG boots. I had felt, I had needles and thread, so I decided to give it a go!
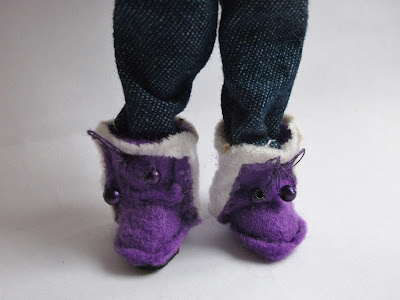
Of course, as a first attempt they're a bit crude. I opted for purple felt to match the doll's waistcoat, and I used some old thin white fleecy material for the trim. It didn't work out as well as I was hoping, but it does pull the whole thing together, so I'm not sorry. 
I had a bit of trouble at first following the tutorial, but thankfully I could pause and rewind the video as often as necessary until it finally clicked into place for me. I really find video tutorials helpful in this regard, because watching someone actually going through the steps is more useful than looking at a signal frame in a photo guide. 
 The soles were actually cut from a piece of black foam that previously came as packaging for some sort of electrical equipment (I can't remember exactly what, it's been so long...). The foam was perfect for the job, and I just love it when you get a chance to use one of those hundreds of 'come-in-handies' we all have lying around :) I tweaked the tutorial slightly by scoring the underside of the soles with some scissors to add ridges for extra grip.
 Of course, 1:12 (Classic) scale is much smaller than the 1:6 scale of most Barbie-type dolls, which the tutorial was made for, so sewing and gluing everything was very fiddly. And I had no buttons small enough to use as final details, so instead I dug through my craft box until I came across 4 purple beads. Using a needle and thread, I sewed bows onto the front of the boots, added the beads onto the loose ends and secured them with a knot on the inside. It would probably have been easier to use wool or embroidery floss for the laces, but cotton thread was all I had :)
  Once the glue had completely dried I pulled the boots onto the Breyer doll's feet, and I'm very happy with the end result. Thankfully, UGG-type boots are designed to be large and easy to pull on. The felt isn't the exact same colour as her vest, but that doesn't bother me. 
 Her jeans didn't really want to tuck inside the boots, but with some gentle persuasion they can be encouraged to go in. The large soles of the boots help the doll to stand up, and her feet fit snugly inside.
All that was left was to give her a name. With her brown hair and blues eyes, she reminds me of my late aunt, so I decided to name the doll 'Janet' after her. I think it suits her, but I don't have any blonde women in my family, so I'm still trying to figure out what to name the GC dolls. I'd like to make more items of clothing for all three of them eventually. But I might need a while to recover from the tininess of those boots :)